In a world where cybersecurity incidents cost companies billions of dollars each year, organizations must work to secure their digital infrastructure. Office 365 infrastructure is often a major target for cybercriminals, and business email compromise constitutes a large percentage of the incidents that Stroz Friedberg Incident Response Services investigates daily. In general, there are three common motives that threat actors have when compromising an Office 365 account:
- Wire Fraud: Threat actors may hijack existing email threads related to financial transactions. They will insert themselves in the conversation using the compromised account or a separate account with a look-alike domain and attempt to change banking details to redirect funds.
- Access to Sensitive Data: Although such data should only be transmitted via secure/encrypted platforms, some users transmit sensitive data over email or on SharePoint/OneDrive. This can include personally identifiable information (“PII”), protected health information (“PHI”), financial records, passwords, or other sensitive data. Threat actors may search the mailbox and/or accessible SharePoint/OneDrive sites for this content and subsequently use or sell the data to other cybercriminals on the dark web. Additionally, attackers may also gain access to mailboxes during a ransomware incident in order to monitor incident response channels and maintain the upper hand in ransom negotiations. Often times these threat actors will even exfiltrate sensitive data found in the O365 environment and then threaten to release the data unless a ransom payment is made.
- Phishing Propagation: Threat actors may use their access to a user’s mailbox to send out additional phishing emails. This allows the threat actor to compromise other users within the organization who may be more likely to click on a phishing link if it comes from another user within the organization. Threat actors may also use this as a method of credential harvesting, where they collect the usernames and passwords of users who enter their credentials into the phishing site. These credentials can be sold to other threat actors or used to access other websites or internal resources through password reuse or single sign-on (“SSO”).
Microsoft’s Office 365 is an increasingly popular email solution for organizations that are choosing to migrate their email to the cloud. There are a variety of security features available within Office 365, but not all tenants have these applied by default. Here are the top 7 configurations that we recommend to harden and provide further visibility into your Office 365 environment.
1. Enable Multi-Factor Authentication
One of the biggest steps that an organization can take to mitigate the risk of business email compromise is to enable multi-factor authentication (“MFA”) for all users in the organization. Based on Microsoft’s metrics, more than 99.9% of successful business email compromise occurs on accounts without MFA enabled. Multi-factor authentication is a key step in reducing the likelihood of successful phishing attempts, as it requires an additional type of authentication outside of just a username and password, increasing the level of effort required to compromise an account. MFA can be implemented within Office 365 or using a third-party solution – Conditional Access policies in Office 365 are useful for implementing MFA and more generally balancing usability and security across a large user base.
For many organizations, especially companies with a large number of users in their Office 365 tenant, implementing MFA can take some time. Organizations can take a phased approach as they work toward full MFA implementation; this should start with enabling MFA for administrators and other high-risk departments (such as IT, finance, C-suite users and their delegates, and others with access to sensitive data), and then gradually rolling out to the larger user population. As with most process changes that affect end-users, organizations should ensure proper communication, documentation, and support models are considered when implementing MFA company-wide.
How to Enable MFA
As an administrator, you can enable MFA via a variety of methods; it is recommended to either enable MFA for your entire Office 365 environment by enabling Security Defaults or via a more customized and phased approach using Conditional Access (which requires Azure AD Premium). For new Office 365 tenants, Security Defaults should already be enabled by default however, most existing Office 365 environments today will require manual configuration. If you utilize a third-party Identity & Access Management (“IAM”) provider, your MFA implementation may differ, and you should consult documentation from your provider.
While traditional MFA provides excellent overall protection against business email compromise and password spraying attacks in particular, sophisticated attackers have begun to evolve simple replay attacks into more complex “Channel Jacking” and “Real Time Phishing” attacks. Consider implementing an authentication factor that is resistant to these emerging threats, such as “passwordless” solutions like Windows Hello for Business or a FIDO2 security token. The Microsoft post All your creds are belong to us! provides details on these attacks and compares available authenticator options.
2. Disable Legacy Authentication
Legacy authentication is a term which encompasses older authentication protocols such as IMAP, POP3, older PowerShell, and Exchange Web Services (“EWS”) APIs. Unfortunately, legacy authentication does not support multi-factor authentication (“MFA”), and thus acts as a way for threat actors to bypass it.
There are two common attack types that largely use legacy authentication protocols, (1) password spray attacks, and (2) replay attacks. Password spray attacks involve attempting statistically common passwords (such as something like “Winter2021!”) across the entire organization in an effort to gain access to an account. Microsoft’s statistics from February 2020 indicate that more than 99% of password spray attacks utilized a legacy authentication protocol. Replay attacks describe some of the most common attack methods used for phishing attacks whereby an attacker reuses a victim’s credentials collected from a malicious site created to appear and function identically to a legitimate Office 365 login page. In more advanced and less common incidents, replay attacks can aim to hijack the victim’s sessions instead of the username & password, which could allow a potential MFA bypass. More than 97% of replay attacks use a legacy authentication protocol according to Microsoft.
Since supporting legacy authentication creates some security loopholes and is known to be used by threat actors so frequently, Stroz Friedberg highly recommends blocking legacy authentication.
Considerations Before Disabling Legacy Authentication
Although the implementation itself is simple, you will need to consider your users’ protocol usage patterns to determine if you are able to disable legacy authentication with minimal disruption. There are some older mail clients that use legacy authentication (such as Outlook 2010, Thunderbird, etc.), so organizations should work to transition any users who regularly use such mail clients to methods of accessing their mailbox that require modern authentication. Some PowerShell Exchange automation scripts that have not yet upgraded to the new Powershell V2 Module may also still utilize legacy authentication, and may have to be upgraded or placed on the exception list before blocking legacy authentication entirely.
Administrators with Azure AD Premium licenses for all users can identify legacy authentication usage for the past 30 days by navigating to Azure Active Directory Sign Ins, adding the “Client App” column, and filtering by the protocols which are classified as legacy.

Alternatively, administrators without an Azure AD Premium license could analyze the types of user agents found in Unified Audit Logs or Mailbox Audit Logs (both are available via all license types), however there is not an equivalent filter to show only legacy authentication. You will have to filter and identify the legacy authentication user agents manually.
Disabling Legacy Authentication
Legacy authentication is disabled by default on newer tenants via Security Defaults, tenants created before October 22, 2019 will likely still have legacy authentication enabled unless it has been manually disabled. Microsoft currently has plans to disable legacy authentication support for all Office 365 tenants that do not utilize legacy authentication in the second half of 2021. If your Office 365 tenant was created before August 2017 you will need to manually enable modern authentication by following Microsoft’s two step instructions. Modern Authentication must be enabled prior to disabling legacy authentication.
Like MFA, legacy authentication support can be disabled via two methods; via Security Defaults to apply to the entire company or via Conditional Access for a more phased approach.
Disabling Legacy Auth via Security Defaults (Applies to All Users):
- Go to https://portal.azure.com/#blade/Microsoft_AAD_IAM/ActiveDirectoryMenuBlade/Properties
- Select Manage Security Defaults
- Under Enable Security Defaults toggle the Yes option
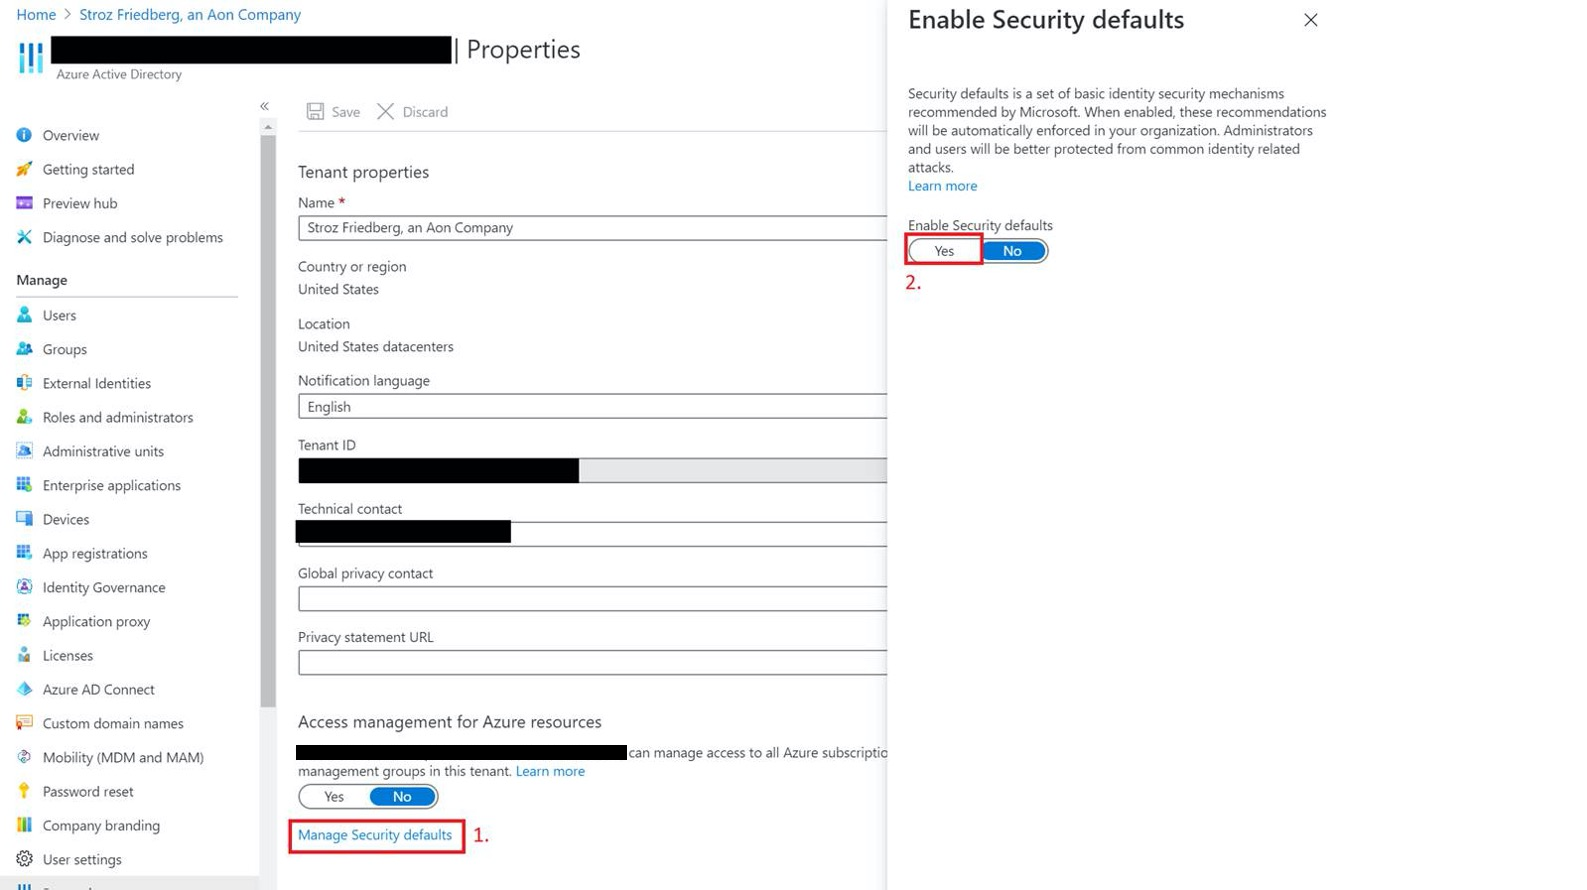
Microsoft’s instructions for enabling Security Defaults can be found here.
Disabling Legacy Auth via Conditional Access (Phased Approach)
Instructions for applying via Conditional Access can be found from Microsoft here. If you have a more complex Office 365 environment such as a hybrid Exchange environment, you may have to follow a more detailed guide here which includes manually enabling modern authentication.
As discussed earlier, only enable if your organization does not have widespread use of Legacy Authentication, and you are prepared to enable MFA for all users.
3. Disable Automatic External Forwarding
Threat actors sometimes exfiltrate data from user mailboxes using inbox rules (such as a rule that forwards all emails with “wire” or “invoice” in the subject line) or by modifying forwarding settings that auto-forward all incoming mail to an external email address. This allows the threat actor to continue receiving the user’s incoming emails even if the user resets the credentials that the threat actor used to access the mailbox.
Even if users set up automatic external forwarding legitimately for their own mailboxes, especially settings that forward all incoming mail indiscriminately, there is a risk of sensitive data leaving the corporate email environment. Specifically, some users elect to forward their corporate email to a personal account, which may not have the same security standards as a corporate account to protect against compromise and misuse of data.
Due to common abuses of external forwarding by threat actors and the legal risks associated with legitimate external forwarding, Stroz Friedberg recommends that external forwarding be disabled entirely or severely limited.
Disabling External Forwarding
Organizations can set a blanket policy to block automatic external forwarding or configure a more nuanced transport rule if complex exceptions are required. Organizations should be aware that there are multiple ways to set automatic forwarding on a mailbox and multiple corresponding techniques exist to block these methods. In general, there are two methods of blocking external forwarding: (1) via a routing rule which will block messages from being auto-forwarded at a mail flow level; and (2) by disabling the user’s ability to setup external forwarding entirely.
4. Enable Unified Audit Logging
If not already implemented, enabling Unified Audit Logging is one of the most important and simplest changes to make to your Office 365 environment. Unified Audit Logs are a core component of any Office 365 investigation and provide a more complete picture in the event of a compromise. Unified Audit Logging includes 90 days of events related to sign-ins, SharePoint/OneDrive access, inbox rule & mailbox setting changes and other important events. With the Office 365 E5 license, administrators are able to view almost every single email accessed by a user (via MailItemsAccessed). For a more inclusive list of events supported by Unified Audit Logging, see Microsoft’s documentation.
Microsoft is in the process of enabling Unified Audit Logging for all tenants, but Office 365 administrators should prioritize making the change themselves rather than waiting for future implementation. There is no cost to enable Unified Audit Logging, and it can be enabled in less than two minutes.
Enabling the Unified Audit Logs
To enable Unified Audit Logging, go to https://security.microsoft.com/auditlogsearch and select Start recording user and admin activity.

Further documentation from Microsoft can be found here.
Note: If you have Office 365 E5, you can opt-in to a 365 day retention policy instead of the default 90 days policy.
5. Configure Mailbox Audit Logging
Mailbox Audit Logging is an additional log source that can log important events such as email deletions, inbox rule updates, and cross-mailbox operations. Mailbox Audit Logging is enabled by default; however, administrators can make changes to improve the available logging by increasing the retention period and/or adding additional operation types logged. The configuration changes below can help speed up analysis in your Office 365 environment and help decrease the overall cost of responding to an incident.
Retention Periods
The default retention period is 90 days; however, organizations can increase the retention period beyond that timeframe. A longer retention period may be useful if a compromise occurred over 90 days prior to being discovered in the tenant.
As of the time of writing, the technical retention limit for Mailbox Audit Logs is 24,855 days, which is equivalent to slightly over 68 years. Unlike Unified Audit Logs, increasing the retention period is not limited to the Office 365 E5 plan nor any other Office 365 premium plans.
Additional Mailbox Audit Log Operations
In addition to retention periods, there are non-default operations for which you can enable logging for as an organization to assist with future investigations that may occur. For a list of full non-default Mailbox Operation/actions available for logging, see Microsoft’s documentation.
The “MailboxLogin” operation is one non-default operation that you may want to consider enabling logging for, in combination with an extended retention period. This can be valuable in several scenarios. For example, imagine you are investigating an incident that occurred over 90 days ago and you do not have Unified Audit Logs available for that time range. Because the MailboxLogin operation is enabled in Mailbox Audit Logs with a 1-year retention period, you can now definitively state whether the attacker logged into that mailbox and when the compromise occurred.
Configure Additional Mailbox Audit Log Settings
To increase your Mailbox Audit Logging retention time to one year and add the MailboxLogin events to your Mailbox Audit Logs to one year for all users, follow these steps:
- Ensure the Exchange Online Management Powershell module is installed.
- Run the following two commands:
Connect Exchange-Online

Get-Mailbox -ResultSize Unlimited -Filter "RecipientTypeDetails -eq 'UserMailbox'" | Set-Mailbox -AuditLogAgeLimit 365 -AuditOwner @{Add="MailboxLogin"}
Note: This will only make changes to existing users. To make these changes for new users, administrators will need to run this command every time a new user is created.
6. Require Admin Approval for OAuth/Cloud Applications
One of the often-overlooked methods some threat actors use to access user mailboxes is through cloud applications. These applications use OAuth tokens to authenticate instead of requiring the typical username/password credential pair (and MFA, if applied), which allows access to these mailboxes to persist even when MFA is implemented and passwords are changed. This type of persistence is less common today; however, it will likely become more popular once MFA is more prevalent in most organizations. Already we have seen oAuth applications used for persistence by advanced threat actors in cases related to the 2020 SolarWinds breach.

Threat actors typically use cloud applications maliciously in one of two ways.
First, using phishing sites, threat actors may present a cloud application access request to a user, asking for permission to access the mailbox. If the user believes the application to be legitimate, they might mistakenly grant full read and write permissions to the threat actor, allowing them to compromise the mailbox. PhishLabs has detailed a campaign similar to this scenario launched as recently as fall of 2020.
Second, threat actors may also use cloud applications as a method of persistence after obtaining the credentials of a compromised mailbox. The threat actor could add a malicious cloud application themselves with full permissions to the mailbox, therefore providing backdoor access to the mailbox that will persist even beyond a password reset or implementation of MFA. During the 2020 SolarWinds-related investigations, responders found that the threat actor took this a mechanism step further by compromising admin accounts and using those admin privileges to grant permissions to all mail in the environment, sometimes using legitimate internal OAuth apps. This type of advanced attack is detailed in Stroz Friedberg’s recent blog post.
Administrators in Office 365 can disable the ability for users to directly connect to new apps via OAuth, and require administrator approval (if configured). If your organization allows users to connect any application via OAuth, administrators should regularly monitor these applications and the permissions that they have. Enterprise applications can be viewed in the Azure AD portal, and tenants with E5 licenses can implement anomaly detection policies and alerts for known malicious or suspicious applications.
Options to manage security settings for these types of applications are below:
Disable User Consent for Cloud Applications
To manage the OAuth applications that are granted permissions in your Office 365 environment, follow these instructions:
- Navigate to https://portal.azure.com/
- Select Enterprise Applications and then select Consent and Permissions (underneath the Security header)
- Select Do not allow user consent or Allow user consent for apps from verified publishers, for selected permissions. For more information to help choose the best option for your organization, see Microsoft’s documentation.
Enable Admin Application Requests
After disabling User Consent, you may want to allow users to interactively request that legitimate applications be added. Enabling the “Admin Consent Workflow” setting will enable these requests to be forwarded to administrators you specify.
To enable the Admin Consent Workflow, follow these steps:
- Navigate to https://portal.azure.com/
- Select Enterprise Applications and then User Settings (underneath the Manage header)
- Toggle “Users can request admin consent to apps they are unable to consent to” to Yes
- Configure the remaining preferences as desired
- Select Save
- More details related to this feature can be found in Microsoft’s documentation.
Disable New App registrations for Non-Admin users
Additionally, organizations can restrict all new application registrations to only Administrators if desired:
- Navigate to https://portal.azure.com/
- Select Azure Active Directory
- Select User Settings on the left side
- Under App Registrations Move the “Users can register applications” toggle to No
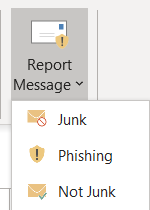
7. Enable the “Report Message” Add-In
One of the most important resources available when combatting phishing campaigns is your users. Oftentimes users may receive and identify a phishing email, but without an easy way to report the message, they might just delete and assume someone else will report the message.
By enabling the “Report Message” Add-In, users will then have the “Report Message” icon in their Outlook client. Additionally, messages reported by users will be tracked in O365’s backend and shown in the Security Dashboard, so administrators can follow up and intervene before the same phishing emails reach other users.
Enabling the “Report Message” Add-In
To enable the “Report Message” Add-in for your organization, follow these instructions from Microsoft.
Conclusion
To protect against business email compromise in Office 365, organizations should implement the above technical controls in combination with security awareness training. Users are often the first line of defense against an attack and should be trained to spot phishing emails that bypass spam filters. Users should also be educated on never providing their credentials to a link or form that they received in an email – they should instead navigate to the site they are trying to access using a known URL or browser bookmark.
Although mitigation efforts are never 100% effective, Stroz Friedberg, an Aon company, has seen first-hand that implementing the technical controls listed above can decrease the chance of compromise significantly, and improving the logging configurations can decrease the cost of investigating incidents when they do occur.
This material has been prepared for informational purposes only and should not be relied on for any other purpose. You should consult with your own professional advisors or IT Department before implementing any recommendation or the guidance provided herein. Further, the information provided and the statements expressed are not intended to address the circumstances of any particular individual or entity. Although we endeavor to provide accurate and timely information and use sources that we consider reliable, there can be no guarantee that such information is accurate as of the date it is received or that it will continue to be accurate in the future due to, among other things, Microsoft making changes within Office 365 or alternative BEC attack patterns that may arise in the future.
Authors: Miranda Skar, Carly Battaile, Alex Parsons
Copyright 2021 Aon plc